Thursday, January 17, 2013

Breakout with accelerometer glove


Project Overview


This project required the integration of at least one continuous input sensor with an interactive game as well as requiring the gamer to "tag" in using an NFC card reader. Our team, Ross Yeager and Ryan Rho, used 1 accelerometer, 1 sport glove, 2 Arduinos, and the Adafruit NFC card breakout board to implement the old arcade game, Breakout, as well as a plotting utility to graph the accelerometer data and visualize gesture recognitions. For our continuous sensing, the accelerometer was used (it is embedded into a glove worn by the player):


-If the player rolls his hand to the left or right, it corresponds to continuous movement left or right in the game for as long as it remains rolled. -A quick upward flick in the Z-axis direction corresponds to a discrete "power" in the game (extending the bar at bottom momentarily).

Image: Device


Images: How to Use the Controller


Utility Tool
Utility Visualizer (X,Y,Z Axes)


The utility was created to visualize the accelerometer data and to show when the selected gestures occurred. The first three plots are the X,Y,and Z axes respectively. The utility was done using the Processing IDE, and the gesture recognition was based on a threshold state machine. Thresholds were determined experimentally, and future improvements of the utility would include user ability to control/adjust thresholds. The right left FSM consisted of the following states:


-NOLR: This state no left or right motion occurs


-LEFT: To get in this state, the threshold must have been crossed downwards and it must remain below the threshold to stay in this state. This state continuously outputs a valid "left" signal and this is visualized in the utility.


-RIGHT: To get in this state, the threshold must have been crossed upwards and it must remain above the threshold to stay in this state. This state continuously outputs a valid "right" signal and this is visualized in the utility.


-LLEFT: Leaves the "left" state. Has an upward crossing of the threshold. Indicates end of left hand rotation gesture.


-LRIGHT: Leaves the "right" state. Has an downward crossing of the threshold. Indicates end of left hand rotation gesture.


The flick motion is detected by looking for an upward crossing of the z-axis threshold. Since it is discrete it only occurs once per gesture (as opposed to left right signals which the user can hold).


Finally a summation plot of all of the axes is at the very bottom of the utility.


Gesture recognition was represented visually in the utility by a shade of magenta/purple.


Utility Video


ARDUINO
Arduino 1: Accelerometer


For the accelerometer, the baud rate is set to 9600 and the accelerometer was wired up to the first 3 analog pins. A2D readings are taken ever loop and sent serially to the host computer in the following format: 

"###|###|###\n"

where the numbers are the X-axis, second Y-axis, and Z-axis readings.


Arduino 2: NFC ID


For the second Arduino, the NFC ID breakout board is connected to it using the built in SPI input pins. The baud rate is 9600 and the nfc object is initiated. Using the Adafruit library, when a user swipes his ID the tag is identified and the total score and high score are sent serially as a string to the host computer. If the game is over and the host computer wants to send a new high score to write onto the card, the serial interrupt occurs and the Arduino writes the incoming data to the card instead of reading from it.


Software

Game: BREAKOUT


We used the classic arcade game, Breakout, for our project game. We used Pygame, a game library for Python. As the basis, we modified a sample game source code in Pygame to suit our project needs and to integrate the sensor and RFID applications into the game. The left and right rotation gestures correspond to left and right movement of the bar, and the upward flick extends the bar to cover more ground momentarily. Points are scored from destroying all of the bricks in the game, and the game is over when the player misses the ball too many times.



Sunday, September 9, 2012

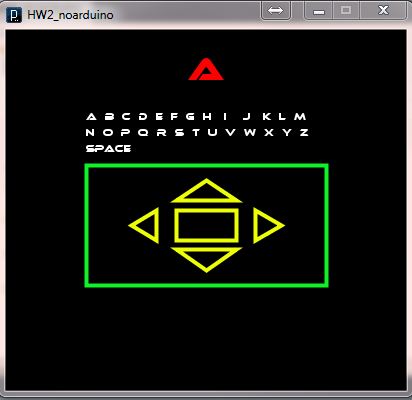
This Here is a home work assignment over the weekend that I had for my device interface class here at UC Berkeley.  The task was to create a simple keyboard using Arduino and additional HW.  I decided to use a 5-key (direction pad) keyboard that displays the letter selected on the computer screen.  

In general, this is a fairly simple task; however, because I wanted to have the computer GUI that talked to the Arduino it made the difficulty level a little harder.  


For the first part, I just used an actual keyboard up, down, left, right arrows and enter to control the Processing GUI.  I will then convert the keyboard input to serial input from the Arduino but it should look very similar.  Here is the initial Processing Code:


//Variables

static final int enterh = 30;

PFont f;

int i, charSelect, col;

color fillUP, fillDOWN, fillLEFT, fillRIGHT, fillENTER;


String words;

String[] keyboard = {"a", "b", "c", "d", "e",

"f", "g", "h", "i", "j", "k",

"l", "m", "n", "o", "p", "q",

"r", "s", "t", "u", "v", "w",

"x", "y", "z", "space"};


//Setup Loop

void setup() {

size(400, 360);

words = "";

charSelect = 0;


col = 0;

background(1);

// Create the font

f = createFont("Ethnocentric", 20);

i=0;

background(0);

}


//Draw loop

void draw() {

background(0);

textAlign(LEFT);

textFont(f,9);

fill(255);

text("a b c d e f g h i j k l m", width/2-4*enterh, height/4);

text("n o p q r s t u v w x y z", width/2-4*enterh, height/4+16);

text("space", width/2-4*enterh, height/4+32);

textFont(f, 30);

strokeWeight(1);

stroke(255, 255, 255);

rectMode(CENTER);

fill(0);

//rect(width/2,40, 90, 40);

rectMode(CORNER);

fill(255, 0, 0);

textAlign(CENTER);

text(keyboard[charSelect], width/2, 50);

strokeWeight(4);

stroke(15, 242, 39);

fill(0);

rect(width/2-4*enterh, height/2-1.5*enterh,enterh*8, enterh*4);

stroke(237, 255, 3);

fill(fillENTER);

rect((width/2)-enterh, height/2, enterh*2, enterh);

fill(fillLEFT);

triangle((width/2)-enterh*1.66, height*.5, (width/2)-enterh*1.66, height*.5+enterh,(width/2)-(enterh*2.5), height*.5+(enterh/2));

fill(fillRIGHT);

triangle((width/2)+enterh*1.66, height*.5, (width/2)+enterh*1.66, height*.5+enterh,(width/2)+(enterh*2.5), height*.5+(enterh/2));

fill(fillUP);

triangle((width/2)-enterh, height*.5-enterh*.333, (width/2)+enterh, height*.5-enterh*.33,(width/2), height*.5-enterh);

fill(fillDOWN);

triangle((width/2)-enterh, height*.5+enterh*1.333, (width/2)+enterh, height*.5+enterh*1.33,(width/2), height*.5+enterh*2);

delay(200);

fillUP = color(0, 0, 0);

fillDOWN = color(0, 0, 0);

fillLEFT = color(0, 0, 0);

fillRIGHT = color(0, 0, 0);

fillENTER = color(0, 0, 0);

textAlign(CENTER);

textFont(f, 16);

fill(237, 255, 3);

text(words, width/2, height*.9);

//println(words);


}


void keyPressed() {

if (key == CODED)

{


if (keyCode == UP)

{

fillUP = color(255, 0, 0);

if(col>0)

col -= 1;

else

col = 2;

if(col == 2)

charSelect = 26;


else{

charSelect -= 13;

}

}

else if (keyCode == DOWN)

{

fillDOWN = color(255, 0, 0);

if(col <2)

col += 1;

else

col = 0;

if(col == 2)

charSelect = 26;

else if(col == 0)

charSelect = 0;

else

charSelect += 13;


}

else if(keyCode == LEFT)

{

fillLEFT= color(255, 0, 0);

if(charSelect>0)

charSelect--;

else

charSelect = keyboard.length-1;

}

else if(keyCode == RIGHT)

{

fillRIGHT= color(255, 0, 0);

if(charSelect<keyboard.length-1)

charSelect++;

else

charSelect = 0;

}

}

else if(key == ENTER)

{

fillENTER = color(255, 0, 0);

if(keyboard[charSelect] == "space")

words = words + " ";

else

words = words + keyboard[charSelect];

}

else

{

fillUP = color(0, 0, 0);

fillDOWN = color(0, 0, 0);

fillLEFT = color(0, 0, 0);

fillRIGHT = color(0, 0, 0);

fillENTER = color(0, 0, 0);

}

if(charSelect < 13)

col = 0;

else if(charSelect <26)

col = 1;

else

col = 2;

println(col + " " + charSelect);

}


Processing is best used with Arduino for receiving serial data.  Here is a Processing example for a simple read over the serial port.

A simple way to test the serial with just your computer is to get 2 USB->Serial connections (RS232), a serial cable and connect them together (USB/Serial-->SerialCable-->Serial/USB) and then you can output and read serial information.  This may help in testing Processing code if an Arduino is not available (as is in my case; waiting for it to arrive, but have an assignment due before then!)  Here is a simple serial read on Processing.

Name

read()

Examples
// Example by Tom Igoe

import processing.serial.*;

Serial myPort;  // The serial port

void setup() {
  // List all the available serial ports
  println(Serial.list());
  // Open the port you are using at the rate you want:
  myPort = new Serial(this, Serial.list()[0], 9600);
}

void draw() {
  while (myPort.available() > 0) {
    int inByte = myPort.read();
    println(inByte);
  }
}

Interacting an Arduino with Processing

Processing is an easy-to-learn language for writing graphics programs based on Java.
You don't have to use Processing in this assignment, but you can.

The basic model to do this is as follows (I'll start with the simple unidirectional case where you are only sending data into Processing):
* You write Arduino code that sends data to an attached PC using the serial port functions.
* You write Processing code that opens the appropriate serial port on the PC and reads the data that your Arduino program sent; it then parses the data and responds appropriately.
* You have to come up with a protocol for your messages so Arduino and Processing agree on the format of the messages. This can be as simple as "send a single number followed by the newline character" and as complex as sending XML or JSON.

This is flexible, but also a lot of work: you have to define the protocol and write two pieces of code. Debugging these setups is also time consuming. In many cases, you only need to read simple analog or digital input pins, and write to output pins.

For this common case, Processing provides a library that consists of 1) A Processing library (called "Arduino") and 2) a special firmware (aka sketch) that you run on your Arduino board (called "Firmata"). Firmata exposes a simple, efficient protocol for reading and writing to pins. The Processing library then creates a wrapper around that protocol with Processing/Java functions that mimc the names of Arduino/C functions.

More information is here: http://www.arduino.cc/playground/Interfacing/Processing

Sunday, June 12, 2011

Using Code On a PC to Interact with the Arduino

Writing firmware to operate a microcontroller such as the Arduino can provide the user with an array of power at his disposal, but the processing power and further interaction is limited due to the nature of the microcontroller itself (its a MICROcontroller aka not an Intel processor).  With this in mind, I was interested in interacting with the Arduino on my PC.  At first I thought I would have to do this in C using Visual Studio and the Windows library (to talk to the COMM PORTS); however, I found another open source compiler from the creators of the Arduino sketchbook called Processing: 

"Processing is an open source programming language and environment for people who want to create images, animations, and interactions. Initially developed to serve as a software sketchbook and to teach fundamentals of computer programming within a visual context, Processing also has evolved into a tool for generating finished professional work. Today, there are tens of thousands of students, artists, designers, researchers, and hobbyists who use Processing for learning, prototyping, and production" 
-www.processing.org


Here's the simple setup for downloading Processing and setting it up for Arduino interaction:

  1. Download the processing zip file from http://processing.org/download/
  2. Extract this file
  3. Download the Arduino Processing library at: http://arduino.cc/playground/uploads/Nilseuropa/processing-arduinomega.zip
  4. Extract this file
  5. Create a folder in your Processing folder called "libraries"; the Processing folder is most likely loaded in your My Documents (not to be confused with the processing zip file that you just downloaded) 
  6. Copy the Arduino folder from the extracted file into the Processing folder
  7. Open up the Processing sketchbook, click Sketch->Import Library and you should see an Arduino library at the bottom of the list
  8. You are good to go! Just include the Arduino library and the Serial library anytime you use Processing to interact with the Arduino. Examples can be found on the Processing website and on the Arduino website (www.arduino.cc)
For my next project I am going to use an infrared sensor to detect motion and use the Arduino and Bluetooth to wirelessly report whenever the motion detector goes off using the Processing sketchbook.


Monday, May 16, 2011

Talking to the Arduino via Bluetooth (using BlueSmirf modem)

This entry involves using Bluetooth to effectively communicate to an Arduino board using the command line.

Parts/Requirements:

Stage 1: Installing Bluetooth and discovering BlueSmirf

  • Plug in USB Dongle into computer- Bluetooth icon should appear in task bar
  • Click on Bluetooth icon, and adjust settings by clicking on Options>check "Turn Discovery On", "Allow Bluetooth devices to connect to this computer">Click Apply
  • Next, power up the BlueSmirf with Dongle connected to computer
  • Click on Bluetooth icon>Devices>Add..>Check "My device is set up and ready to be found"> Click "Next"
  • The Bluetooth should detect the device (name should come up as FireFly-<ID>), if it does not detect...Try different ways such as restarting the computer, adding the device again, and making sure the BlueSmirf has solid connections (I soldered it to headers)
  • If it installs properly, at the end of the Bluetooth wizard you should see something like this:
  • Make not of the Outgoing COM port, as that will be the port you use to communicate with the BlueSmirf and Arduino
  • The FireFly-BE11 (BE11 was what it was on mine) will show up under your Bluetooth devices
  • Then, you must connect the device to the computer.  Open up HyperTerminal: Start>Programs>Accessories>Communications>HyperTerminal
  • A prompt will pop up saying the device wants to connect to the computer...click on prompt.  It will ask for a password, type in 1234, and your device is paired! You do not have to do this again after the first time  (unless you remove the FireFly device from the Bluetooth device list)
Stage 2: Building the circuit and programming the Arduino
  • I soldered headers onto the BlueSmirf for good connections
  • See following picture for connecting circuit (Use P0 and P1 for Rx and Tx instead, and I used P3 as the port to control the LED)


  • Now unplug the BlueSmirf, connect the USB serial programmer from the computer to the Arduino, I used the following code:
int counter;
byte newbyte;

void setup() {
 Serial.begin(9600);
 pinMode(3,OUTPUT);
 digitalWrite(3,HIGH);
 delayMicroseconds(1000);
 counter=0;
 newbyte='h';
}

void loop() {
  
  // put your main code here, to run repeatedly: 
  if(Serial.available()>0){
    newbyte=Serial.read();
    if(newbyte=='h'){
      digitalWrite(3,HIGH);
    }
    else
      digitalWrite(3,LOW);
  }
  
  Serial.println(counter,DEC);
  counter++;
  delay(300);
}

  • Once the Arduino is programmed, unplug the USB connection and re-connect the BlueSmirf
Stage 3: Talking to the Arduino using the commandline

  • Power up the Arduino/BlueSmirf- red light should be blinking on the BlueSmirf
  • Open up HyperTerminal, follow the steps below:
Type in a name for the connection (I used "Bluetooth")
Under the 'Connect Using' menu, select the COM port that was the Outgoing COM port when installing the Bluetooth (can also check again by clicking on the Bluetooth icon>COM Ports Tab) and then click OK
  • Should see the counter in progress
    • Can enter command mode by pressing '$$$' followed by Enter
    • Exit command mode by pressing '---' followed by Enter
    • Can configure the BlueSmirf in command mode
  • Can turn the LED on and off by pressing any key to turn it off, and 'h' to turn it on
VIDEO DEMO OF STAGE 3:


NOTES FOR USING BLUESMIRF INTERFACE WITH ARDUINO:
Troubleshooting:
1. -Power up BlueSmirf


-Make connection through your Terminal (I used SimpleTerm Gold trial version) and get the green led
-Type "$$$" before 60 secs from the power up, and it should respond with "CMD" and the red LED will flash
-Type "H" -> Set commands
-Type "SU,57600" -> to change the baudrate and respond "AOK"
-Type "D" -> Display settings to see the new baudrate.
-Reboot the BlueSmirf to make the change happen.


2. Solder connections to Bluesmirf for good connections

3. Use Hyperterminal (TeraTerm did not work for me):

-Power Arduino and Bluesmirf on
-Connect to COM7 (the SPP COM port)
- $$$ -> command mode
- --- -> exit command mode
-Should bring up the counter from the arduino board
-Can type commands, will get sent to Arduino